
Don't Starve Together: Cursed Confrontation Part 2 Walkthrough
 Maxim Tomilov
For ten years, Charlie has been attacking Don't Starve Together players from the darkness. Now, in Cursed Confrontation Part 2, you can finally fight her. Here's how to start the ritual at the Ancient Gateway, obtain all three shadow offerings, and survive the two final bosses.
What to Do Before the Ritual

Part 2 picks up the Shadow storyline where Part 1 left off. Before starting the ritual, make sure you've completed the following steps in your world:
- Defeated the Ancient Fuelweaver at least once.
- Given 5 Dreadstone to the Beckoning Hand at the Ancient Gateway, allowing Charlie to repair the Gateway and opening Shadow Rifts in the Caves.
- Obtained the Ancient Key dropped by the Ancient Guardian.
- Obtained the Keystone from the Reliquary in the Sanctum, which you visited in the first part of the update.
The Ancient Key doesn't disappear after the Fuelweaver fight. The Gateway spits it onto the ground, so just pick it up. Keep the Keystone in the Caves, though. You can't take it to the Surface, and it will be left by the Stairs if you try.
How to Start the Ritual at the Ancient Gateway

Head down to the Atrium with both keys. Another Beckoning Hand will appear at the repaired Gateway. Give it the keys. If the Ancient Key is already inserted into the Gateway, the Hand only needs the Keystone. Charlie will immediately appear, insert the keys herself, and conjure a new pattern over the old one on the floor, with three circles for offerings. She will then explain the requirements:
"The ritual requires sacrifices. Only the most extraordinary specimens are worthy. Find them. Let the shadows touch them. Kill them. Bring me their essence. Then the ritual may begin."
She also gives you a Possessed Shadow Atrium, which you'll use to call an old enemy to your aid. Incidentally, ordinary monster drops won't work in the circles. You need three specific offerings.
How to Summon a Friendly Ancient Fuelweaver

The Possessed Shadow Atrium brings the Ancient Fuelweaver back, but this time as a companion rather than a boss. You can summon him at an Odd Skeleton anywhere in the Caves, so there's no need to return to the Atrium. Assemble the skeleton using 8 Fossils and insert the Possessed Shadow Atrium.
The Fuelweaver won't attack you or retaliate if you hit him. He follows whoever is holding a fueled Shadow Thurible, obtained from your previous fight with him. The Thurible runs on Nightmare Fuel: one piece adds 3 minutes, and it can hold up to 9 minutes of fuel, so bring some extra. If you get too far ahead, your companion will teleport to catch up. Along the way, the former king happily comments on everything he sees: the Ruins, statues in the Archives, the Nightmare Werepig, and the Sanctum. Clearly, he has plenty of stories to tell.
A few important things to keep in mind:
- Only one Ancient Fuelweaver can exist in a world at a time. Both the hostile boss and friendly companion count toward that limit.
- If you kill the friendly Fuelweaver, he'll drop the Possessed Shadow Atrium and the Fossils, but none of his usual boss rewards. This is a convenient way to "move" him closer to your next target by rebuilding the skeleton there. Don't take too long, though. The Possessed Shadow Atrium stays on the ground for a while before it starts running away.
- Don't insert the Possessed Shadow Atrium into the skeleton at the Ancient Gateway itself. You need it to summon your companion elsewhere in the Caves.
The Possessed Shadow Atrium Charlie gives you won't run away until it's been lying on the ground for some time. If you do lose it, you can make another. Find an Ornery Chest in the Ruins, a hostile mimic that disguises itself as an ordinary Ornate Chest after the Shadow Rifts open. Place a regular Shadow Atrium inside it, or let it swallow one from the ground, then kill the chest. Pick up the dropped Possessed Shadow Atrium immediately, or it will hop away. You can catch it in a Trap.
Which Offerings You Need

You'll need the Ancient Fuelweaver to approach three creatures and transform them into their Blighted versions. He does this automatically as soon as he gets close enough, briefly immobilizing each creature before corrupting it. Every Blighted creature drops a different organ needed for the ritual:
- The Rock Master drops the Blighted Claw.
- The Hound Batilisk drops the Blighted Larynx.
- The Great Depths Worm drops the Blighted Guts.
You can tackle them in any order, but the organs must be different. Two copies of the same offering won't count. The important part is that each creature must be corrupted before you kill it. Defeat its normal version, and you won't get the organ you need, forcing you to wait for another spawn.
Rock Master and the Blighted Claw

The Rock Master lives in the rocky areas of the Caves, among herds of Rock Lobsters. He's easy to spot: he's noticeably bigger than the others and has a red shell. The other lobsters won't join the fight. Instead, they'll stand around cheering their master on with battle cries. Once he's dead, however, they'll get angry and turn on you.
The normal Rock Master has 4,000 Health and deals 100 damage per hit. His main attack is a straight-line claw swipe, so dodge sideways rather than backing away. He also dashes at his target every 4 seconds, hitting anything in his path. After taking enough damage, he retreats into his shell. In that state, he absorbs 95% of incoming damage and regenerates 10 Health per second. That's your cue to pull out a Pickaxe. After 4 hits, the boss emerges from his shell and is stunned for 4 seconds, giving you time to land 7-8 attacks. During Acid Rain, he moves 25% slower, deals 25% less damage, and takes 25% more damage.
Only one Rock Master can exist in a world. When there isn't one, a random fully grown, sleeping Rock Lobster transforms into a new Rock Master once every 10-20 days. This is something worth planning around.
The regular Rock Master drops a Craggy Carapace. This armor absorbs 95% of damage, has 1,050 durability, and slows you by 30%. More importantly, it completely prevents knockback. While you're riding a Beefalo, attacks that would normally knock you out of the saddle won't dismount you, though each such hit costs the armor 5% durability. That's extremely valuable in the final fight.
That suggests a simple plan: if you intend to fight the final bosses on a Beefalo, kill a regular Rock Master first for the Carapace, then wait for a new one and have the Fuelweaver corrupt it. If you already have suitable armor, take the Fuelweaver straight to the first Rock Master you find.
The Blighted Rock Master has 5,000 Health and deals 100 physical damage plus 20 planar damage. His attacks are similar, but now he can disappear into the void and perform a series of dashes, reappearing on different sides of his target. The lower his Health, the more dashes he'll chain together. Don't try to chase him after each dash, because he'll vanish again immediately. Instead, keep sidestepping out of his path, wait for the sequence to finish, and strike during the brief pause after the last dash. A Pickaxe won't help this time, since the Blighted version can no longer hide in its shell. Once you win, collect the Blighted Claw.
Hound Batilisk and the Blighted Larynx
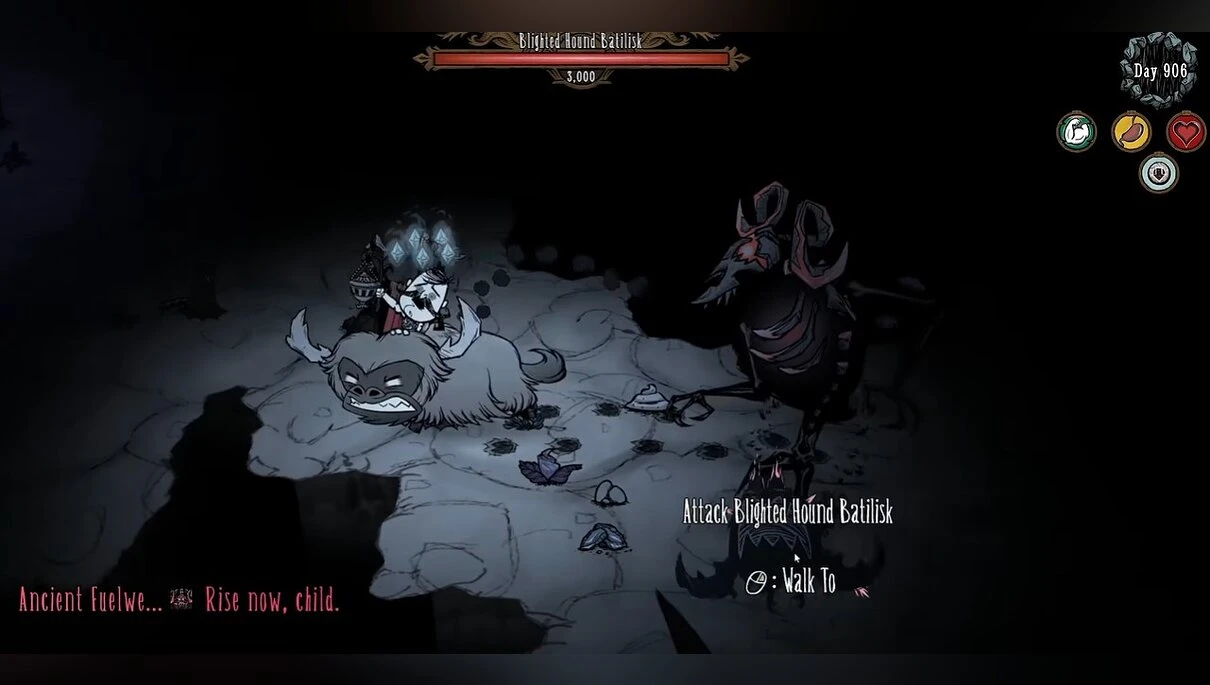
The Hound Batilisk lives in the guano biome, inside a Big Bat Cave. Its den is taller than ordinary bat caves and stands out quite clearly, so it shouldn't be difficult to find. During the day, the Hound Batilisk stays inside, emerging at Dusk or Night, or if you get too close to the cave. The normal Hound Batilisk has 1,500 Health, and another spawns 10 days after the previous one dies. During Acid Rain, it deals 50% more damage and moves 25% faster, but also takes 25% more damage itself.
Its main attack resembles that of a Slurper: the Batilisk jumps onto your head and drains Health instead of Hunger. It knocks your helmet off in the process. As soon as it latches on, open your equipment screen and remove it from your head, then retrieve your headgear so it doesn't get lost among the Batilisks and loot.
You're better off fighting it without a Beefalo. The game accounts for differences in height, and riders sit higher up, so the Hound Batilisk grabs them immediately after jumping. You can't dodge this even on a fast Beefalo. On top of that, it howls during combat to summon regular Batilisks for help.
The Blighted Hound Batilisk is more dangerous than it looks. It has 3,000 Health, and its attacks deal additional planar damage. It no longer summons reinforcements, but when its Health falls to 1,500, it splits into two copies. If you kill one while the other still has plenty of Health, the survivor will split again after a few seconds. Try to keep both copies at roughly the same Health and finish them off together. The Brightshade Staff works well here because its projectiles bounce between targets. Just deal with any nearby regular Batilisks first, or the bouncing shots will hit them instead.
For an ordinary character like Wilson, this may well be the hardest of the three fights. Collect the Blighted Larynx once you've won.
Great Depths Worm and the Blighted Guts

You can't find this worm in a den. It arrives during a Depths Worm attack, replacing the usual wave. Under normal circumstances, after Day 25, its chance of appearing increases by 5% with each wave, up to a maximum of 50%. The good news is that after you hand over the Keystone, the next worm attack is guaranteed to bring a Great Depths Worm. You won't have to wait an indefinite number of waves, although you still need to wait for an attack to occur.
Use that time to prepare an open fighting area away from your structures. The worm swallows items on the ground and stays still while digesting them. Scatter a few disposable items across the arena, and don't leave anything valuable nearby. You'll know the boss is approaching when you hear a series of small earthquakes and a howling sound in the background.
The Blighted Great Depths Worm is faster than the normal version, and once its Health drops below half, its speed increases by another 50%. Don't chase its head. Lure it toward the items you've scattered and attack during the pauses. Avoid feeding it living creatures, though: if it swallows a Rabbit or Rock Lobster, the Blighted Worm releases three explosive projectiles. Every body segment counts as a separate target, which makes bouncing weapons such as the Brightshade Staff especially effective. Once it's dead, collect the Blighted Guts dropped by its head.
How to Place the Offerings

With the Claw, Larynx, and Guts in hand, return to the Ancient Gateway. Drop one organ into each of the three circles on the floor. When an offering is placed correctly, it rises and floats above its circle. The order doesn't matter here either.
Be warned: placing the third organ starts the fight immediately, with no confirmation prompt. Place the first two, then get ready. This is a very tough fight, especially on foot, so riding a Beefalo is the most convenient option. Here's what to bring:
- Craggy Carapace, so attacks won't knock you off your Beefalo.
- A wearable light source. Every other light in the arena will be extinguished.
- A ranged weapon and plenty of ammunition, such as a Gloomerang.
- The Lazy Explorer, so you can teleport out of an attack instantly if you don't have time to run.
- Treats for your Beefalo, since hits against the rider will hurt the mount as well.
- Food, healing items, and armor.
After the ritual, Charlie says, "We've done it. Those we call Shrouden have accepted our sacrifices. Only one remains." The shadow entity chooses Charlie herself as its final sacrifice, and everyone in the Gateway chamber is teleported to her arena. The Queen won't appear straight away, but standing beneath or close to her will make her descend sooner.
How to Defeat the Shrouded Queen

Once possessed, Charlie becomes the Shrouded Queen, a boss with 18,500 Health. Her regular attack sends a wave of shadows forward and knocks you back. The easiest way to avoid it is to get behind her.
When the Queen drops below 95% Health, Horror Hands begin appearing in the arena and extinguishing any light, even summoned stars. The only things they can't put out are Night Lights, the Queen's Torch, and light sources equipped on your character. That's why you should keep your light on you. Stepping on a Hand drives it away, but more will soon appear.

After that, the Queen alternates between defenses against melee and ranged attacks, switching modes each time she loses another 10% of her Health. That threshold isn't absolute: she has to finish her current action before she can switch, so if you cross it during one of her attacks, you may squeeze in some extra damage. Here's how the modes work:
- Anti-melee mode. When hit at close range, the Queen sends out thorny vines and knocks characters backward. Later, she starts scattering clusters of vines in a spiral. They may crawl toward you, and getting caught deals 75 damage and roots you in place. Taking any hit frees you, but that is usually followed by a sweeping attack. Two such combinations can cost you almost 200 Health. Switch to ranged attacks during this phase and keep moving.
- Anti-ranged mode. Your projectiles stop damaging the Queen and instead turn into Swarming Horrors that pursue their target and gradually accelerate. The Queen also summons these creatures herself every 13 seconds if you haven't managed to deal 1,850 damage to her in time. The only way to shake them off is to enter complete darkness. Night Vision won't help. Remove your light source, move away from the Horrors, and return to melee combat. If you simply keep running, they'll disappear after 16-20 seconds.
Once the Queen has only 20% Health left, Grim Harriers join the fight. They charge at you and deal 50 damage when they land, while the Queen may hit you with one of her heavy attacks at the same time. They're easier to dodge if you run toward them rather than away from them. The Brightshade Staff is also useful for driving them off.
How to Defeat the Umbral Abomination

Defeating the Queen isn't the end. She is pulled into a portal, spits out the Umbral Abomination, and turns back into Charlie before disappearing. A puddle remains where she stood. After 20 seconds, or as soon as you approach, the real final boss, the Umbral Abomination, emerges from it. Use that pause to heal.

The Abomination has 16,000 Health. Unlike the Queen, it doesn't extinguish light, but many of its attacks knock you back, and their areas of effect are enormous. The more damage per second it takes, the more frequently it attacks. Here's what to watch for:
- It opens a portal that releases Ink Blights. Some leap toward the direction the boss is facing, while others circle around it in a spiral and shower the arena with projectiles. At high threat levels, the creatures that slither after their target and bite repeatedly can also appear early. Once the Abomination drops below 66% Health, it also summons creatures that fall from above and try to swallow a character. These devouring creatures can knock you off a Beefalo even through Craggy Carapace, while the bites from the slithering ones can keep you stunned for a long time. Dodge them rather than trying to kill every one.
- It dives into a puddle and resurfaces near you, leaving pools around the arena that slow your Beefalo. The solution here is simply to keep moving.
- Starting at 83% Health, it teleports directly above you and fires a laser from its eye. It repeats this every 29 seconds, and when it drops below 33% Health, the beam grows wider. If it corners you, use the Lazy Explorer.
- Starting at 95% Health, Dreadstone Outcrops erupt around players. You can see warning marks on the ground before they appear, giving you time to dodge. The lower your Sanity, the more frequently they emerge: every 13 seconds at full Sanity, but every 4 seconds at zero. The Outcrops block your path, although they can also shield you from Shrieks and Rictuses. You can break them with a Pick/Axe, a Brightshade Smasher, or a Brightshade Bomb.
If you're wearing an Enlightened Crown, prepare to take extra damage: Outcrops near you begin flashing red and then explode, dealing 100 physical damage and 40 planar damage to everything nearby, including your Beefalo.
Incidentally, the boss's displayed name depends on what you're wearing or which skills you have unlocked. With a Masque, it's called Tenebrau; with one of the Ancient Masks, it's The Other; and with a Shadow Affinity skill unlocked, it appears as Shrouden, the shadow god himself.
After you defeat the Abomination, it turns into a puddle with an eye in the middle. Step on the eye to finish the fight and bring the entire Shadow storyline to a close. Then take the passage in the center of the arena back to the Ancient Gateway.
What Rewards You Get for Finishing the Story

Any items you left behind in the arena, such as a Krampus Sack, will drop back out after the fight. Three rewards will be waiting for you at the Gateway:
- Queen's Torch.
- King's Staff.
- Queen's Visage, awarded only for the first victory in a world.
The Visage is a head-slot item with no other practical uses, and it even drains Sanity when Maxwell or Winona wears it. The other two rewards are much more interesting.
The Queen's Torch burns forever and lights a much larger area than a normal Torch. With Wilson's Torch Range skills unlocked, it can illuminate nearly the entire screen, and it keeps shining even when dropped on the ground. The Torch clears Miasma and repels most Horrors within a radius of 2.5 turf tiles, including Shadow Splumonkeys, Parasitic Shadelings, and Grim Harriers. It doesn't affect Ink Blights. You can't use it to set anything on fire.
The King's Staff never breaks and increases your movement speed by 30%, just 5% more than a regular Walking Cane. Its real appeal lies elsewhere: you can socket any basic Gem into it and gain the corresponding Staff's effect. The only exception is the Iridescent Gem, so you can't reproduce the Moon Caller's Staff:
- Red and Blue Gems give it the effects of the Fire Staff and Ice Staff.
- A Green Gem grants the effect of the Deconstruction Staff.
- A Yellow Gem grants the effect of the Star Caller's Staff.
- A Purple Gem turns it into a Telelocator Staff, which, unlike the normal version, also works in the Caves.
- An Orange Gem grants the effect of the Lazy Explorer.
Every use adds Corruption points to the Staff, and Nightmare Fuel begins seeping from its head. Blue and Red Gems add 3 points each, Orange adds 5, Purple and Yellow add 15 each, and Green adds 20. The limit is 100 points. Until you reach that limit, the Staff loses one point every 12 seconds, and you can swap the Gem. Be aware that the Staff drains Sanity: above 20 Corruption, you lose 5 Sanity per minute; above 50, the drain rises to 10; and above 80, it reaches 20 Sanity per minute. Maxwell doesn't lose any Sanity from the Staff at all.
At 100 Corruption, the Staff becomes fully Corrupted. It drains 20 Sanity per minute, the Gem gets stuck, its spells acquire cooldowns, and Corruption no longer decreases on its own. In exchange, it gains several new abilities:
- Shadow Creatures become neutral toward its wielder.
- Rabbits, Bunnymen, and Splumonkeys transform into their Shadow versions.
- Rock Masters, Hound Batilisks, and Great Depths Worms can be transformed into their Blighted versions, with a 30-second cooldown.
- Clockworks and their sculptures can be transformed into Shadow Pieces.
- Dreadstone Outcrops can be summoned from fissures.
To cleanse the Staff, place it in the Moon Stone during a Full Moon and defend it against Hounds and Werepigs for 50 seconds, just as you would when transforming the Star Caller's Staff into the Moon Caller's Staff. Afterward, the Corruption counter resets to zero, and you can change the Gem again.
Can You Repeat the Ritual?
Yes. Defeating the Umbral Abomination doesn't end your playthrough. If you kill the Ancient Fuelweaver again, the Ruins reset, along with the Sanctum, and a new Keystone appears in its Reliquary. Just remember that when the Sanctum resets, any items and structures you've left there will disappear. You also have to wait 20 days before you can insert the Key into the Gateway again.
You'll need the same three organs to repeat the ritual, and you won't receive another Queen's Visage. The friendly Ancient Fuelweaver can still corrupt the creatures for you, but a fully Corrupted King's Staff can do the job on its own. That means you no longer have to assemble a skeleton and escort your companion through the Caves.
Defeating Charlie brings the From Beyond Shadow storyline to an end, but the nights don't get any safer. Something still kills you in the darkness, and it's clearly no longer Charlie. The game hasn't revealed what it is.